Are you new to the Avery Weigh-Tronix ZM223 indicator or looking to maximize its capabilities? Whether you’re a technician, operator, or engineer, understanding its features and best practices can streamline your operations and help you avoid common pitfalls. In this comprehensive overview, you’ll learn about the ZM223’s design, communication options, keypad features, setup tips, and more — all in a straightforward easy to understand format.
What You Need to Know About the ZM223 Indicator: An Overview
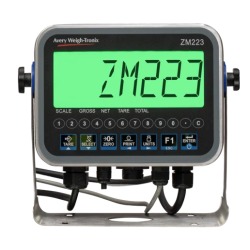
The ZM223 is a modern addition to the Avery Weigh-Tronix Z-Series line, designed with a focus on user-friendly operation and versatile connectivity. It replaces older models like the 301 with a smaller footprint, larger display, and several enhanced features tailored for various industrial applications. From its color-changing backlight to expanded communication options, understanding these features will empower you to use the indicator confidently and efficiently.
Today we’re looking at the Avery Weigh-Tronix ZM223 indicator, which is the newest addition to the Avery Weigh-Tronix Z-Series indicators. So in this article we’re going to be looking at things like the new design, available communications that are on board, any changes to the main board, a couple of available options, and a little bit on menu navigation.
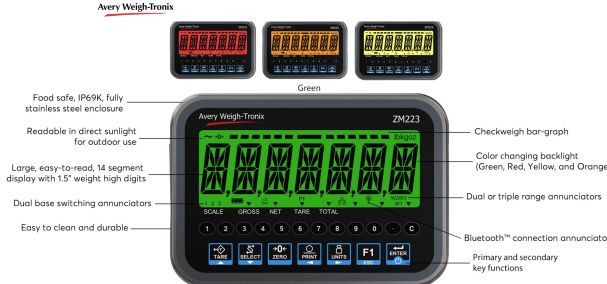
The ZM223 display is larger than other ZM indicators like the ZM303 for example. It will easily fit into existing columns. So if you’ve got a site that had something in the existing Z series, you know, like a 300 and for whatever reason they need to replace that indicator, like on a bench scale, this should fit right in that column. So it’s going to help keep any replacement costs down.
In addition to just those aspects there that we were looking at on the measurements, the factory has incorporated a color changing backlight, which really that comes into play especially in applications like Checkweighing because you could set that backlight to change colors. The standard setting for that is green for accept, orange for over and red, under and yellow when the scale approaches zero.
What’s good about this is it can eliminate the need for external stack lights. There is also the option to turn the backlight off and in that case you would have black characters on a gray screen. That could sometimes be useful, especially in like really bright environments.
In addition to changes in the display, the factory has also made some changes to the keypad. Most notably, there’s a dedicated enter key. Of course, there is also a numeric keys, one all the way up to zero, a decimal point, clear key. Other than the enter key, we have kept the layout of your normal weighing keys about the same. You should see Tare, Select, Zero, print, units, and F1. Another change, the keypad overlay is a flat overlay, still very durable. Because we’re talking about the front panel and we kind of are going to make some comparisons between the 223 and the indicators of the 300 series.Â
Of course, most obvious one that you’re going to notice, there are fewer keys on the 223 than on the 303. But that does not mean that there is less functionality. The factory just moved the functionality into different areas.
So if we’re making a comparison to the 303. The 303 had dedicated keys for these functions. For the 223, these keys are gone. However, the functions are not. They’re going to be either in the service menu or you can assign to what we’re calling an RPN. what you’re doing is you’re assigning functionality to different keys.
And you can assign pretty much any of the functions that you were looking for. You can assign to other keys on the keypad. Tare is the exception in that you can still use RPN functions or Tare related functions. So what that means is if you have a known tare, just like you could do on a 300 or 400, you have a known tare weight, say it’s like 25 pounds. You can type in 2, decimal, 2, 5, and hit the tare button. That’s going to work just fine. So the only key that you cannot assign RPM function to is the zero key.
ZM223 ENCLOSURE
There is still a gasket. There is a gasket that goes in between the back, the plate and the rest of the housing. Based on feedback the the dome nuts on the back are larger and there are fewer of them. The hope is making the dome nuts larger, it will be less likely to drop them or lose them and make installation a faster. The dome nuts are the same size as what’s currently used on the ZM600 series.
Another change is the vent. It’s now incorporated into one of the strain relief glands. The purpose of that band is to help maintain IP69K certification without getting moisture building up inside. Without the vent there could actually be moisture build up inside the indicator due to condensation due to temperature changes, etc. The factory put it in the strain relief gland to give it slightly smaller profile.Â
Â
ZM223 COMMUNICATIONS
All right, let’s look at some ZM223 communications. The indicator features two RS-232 serial ports. There’s also onboard ethernet connection and the USB host connection. So those are standard communications. In addition, you’ll see BLE Bluetooth. The BLE stands for Bluetooth Low Energy. Bluetooth is turned on by default.Â
ZM223 MAIN BOARD
The factory changed the orientation of all of key connectors. So basically they rotated them up a little bit. Those quick connectors, the power connector, and the RJ45 Ethernet connection, they’ve all been changed. You’ll see the P1 and P2 jumpers. These are the jumpers for the four or six wire load cell configuration. By default, these will be set for the what is now the more popular four wire setup. So if you’re using six wire load cell cable, you want to make sure that you change the jumpers.
One more thing to mention about the 223 main board. That is just the micro SD card slot. Of course, as the name implies, this is where you’re going to install the micro SD card that comes with the instrument. The indicators ship with micro SD card that is preloaded with a bunch of different weighing applications and the latest version of the bootloader, and the latest version of firmware. All of the current applications are on the 16GB micro SD card. That micro SD card is typically not inside the indicator, it’s in the box. So, be sure to locate that SD card when you’re un-boxing the indicator. You don’t have to install the card but it’s strongly recommended.

ZM223 POWER
ZM223 is powered by an internal 30 watt power supply. That power supply is mounted on the inside of the back. This unique design is ideal because putting that power supply on the side back panel, you get a little bit more room to work inside the indicator when you’re connecting load cell cables.
ZM223 OPTIONS
So in addition to the onboard ethernet, Bluetooth, USB and serial communications, there are a couple options for expanding the 223 capabilities. Specifically, there is an analog output card and a severe transient voltage suppression card.
From a mounting standpoint, is an either or situation. And we’re gonna get into how they mount. You either mount the analog output card or the STVS.
ZM223 ANALOG OUTPUT CARD
This has been completely redesigned for the ZM223. Instead of mounting inside the indicator, this analog output card mounts to the studs on the inside the back panel and includes a wire harness that’s going to come off the board. Add a couple of zip ties so you can mount it to the power supply housing and then zip tie it in place.
Regarding connecting the card to the indicator. You’re going to have to use one of your two RS-232 serial ports. So that ties up one of your serial boards, but you still have one left. If you need wire up, say a scanner or a printer, that’s serial connection. Regarding configuration, there are no switches and no jumpers that you need to change it from current or voltage output. All that’s going to be handled through the configuration. There are only two physical connections. Legacy analog output boards don’t work on the ZM223. You’ll need AWT05-101259.

USE ZTOOLS FOR SETUP
The easiest way to set up the analog output card is to use ZTools. ZM223 there’s only one configurable card so from the drop down you’re just going to choose analog out. It’s the only option but you have to do it because it’s going to default to none.
The most common setup is 4 to 20 milliamps. So if that’s the setup that you were looking for, you come into mode and go to use this drop down.
The only other option card that is currently available and supported by the 223 is the STVS or severe transient voltage suppression card.Â
Again, this card mounts inside the back panel. The whole purpose of this is to protect the scale, so to protect the scale connections and to also protect the serial boards. So this STVS card, is designed to be used for large outdoor installations. Possibly truck scales or maybe even like batching applications, things of that nature.
ADDING BSQ BASE TO THE ZM223
The ZM223 can easily connect to the BSQ digital base, which makes a really good solution for a lot of different light capacity applications.Â
Regarding the connecting cables. There are two ends of the cable that run between the BSQ base and 223 indicator. The RJ45 end that plugs into the BSQ base. And then the other end is a connector that plugs into the board. This is a serial connection, just like all other BSQ connections are. Once it’s wired up correctly, you can either setup the scale using the admin menu or by going through Ztools.
ZM223 INDICATOR APPS
Looking at indicator apps. This is where you need the 16GB micro SD card installed. It’s going to be preloaded with all of the current standard applications as well as latest version of firmware. So for that reason, if for no other reason, make sure you install it that way. There are a dozen applications available on there. So once you install that micro SD card into your indicator, you can then power off the indicator.
And it’s going to do a couple of things. It’s going to check that loader and it’s going to update loader. Really, what’s happening in the background is checking the version of the bootloader on the SD card and comparing it to what was on main board. By default, the application that’s going to be loaded on the main board is the general weighing application. So you can easily change the active application. At this point, you do not need Ztools. However, you can still use Ztools if you prefer.
You can still grab the application right off that micro SD card. So it’s going to boot into probably the general weighing application. But there you are going to press the F1 key until it prompts you for a password and you’re going to use the password and press enter. The screen is going to say update. So you need to press the right arrow key until it says PDSD. That means update from the SD card. So if you’re trying to take full advantage of that, you want to change over here to PDSD. At that point, you’re going to press enter and it’s going to tell you the name of the application. It’s probably going to show you the name of the application that’s currently running on the indicator, but it’s a menu. Just use the right and left arrow keys to scroll through the available applications until you find the one that you want. Once you find the one that you’re looking for, you’re going to press enter. It’s going to say it’s updating and then it’s going to then the indicator is going to reboot and it’ll reboot into the application that you chose.
ZM223 Quick Cal
That is going to unlock quick calibration. The way this works, you’re going to press pull the F1 key until you’re prompted for a password. And you’re going to use the password and press enter. It’s going to default to scale 1. You’ll press enter again. At that point, you want to make sure you remove all of the weight from the scale. And then you’re going to press enter again. Then the indicator is going to show you C 0.00. It’s basically telling you that it is capturing the zero point. It’s in a calibration mode. It’s in the zero calibration mode. So once you get everything off the scale, you want to make sure you press enter. The indicator is going to show busy and then it’s going to give you or it’s going to show you the most recent span weight value.
If you’re using a different span value, that’s when you want to key that in. So if it shows span 20 from last time and now you have 30 pounds…. If you were changing that, key in 30 and press enter. If you’re using the same span weight, you just press enter. Then you’re going to load that span weight onto the scale and press enter again. You’re going to press enter again and it’s going to jump right to Save. Yes. You’re happy with how that count procedure went. You press enter and it’s immediately going to go into live weighing.
USER MENU
Let’s go through some of these menu changes kind of quickly. One thing I like to point out in the 111 user menu, you got a couple of different changes here actually. So end users could now change the normal operating color of the back light. So the default setting, it’s going to be a green backlight black text. If the end user has the 111 password, you can change it. Maybe you like the yellow or the red for whatever reason. That’s not to be confused with changing the colors for the checkweighing application. This also now gives access to change the IP address.Â
ZM223 PRINT FORMATS
So with print format editor, we have 200 quick formats available and almost half of them are pre-configured. Ztools can make this much easier. We typically recommend Zebra printers for Avery Weigh-Tronix Z series equipment. You could also possibly look at Godex or Epson. Meanwhile, connecting to PLCs, is still an important thing. So by default PLC setting, ZM223s, that’s going to be set with four outputs and two inputs.
TRUCK IN / OUT
On the truck in out application, that’s going to be similar to the 305, but the 223 has less keys on the keypad. So you will need to assign some of the functions to other keys.
COUNTING
As we wrap up this Complete Guide to the Avery Weigh-Tronix ZM223 Indicator: Features, Setup, and Tips entry, let’s take a quick look at parts counting. Now most of the time when you’re looking to count parts, we recommend using a ZK830 counting scale. But, did you know that you can also connect a ZM223 to a BSQ scale base and have a similar setup as the 830?
Counting applications, if you’re connecting a ZM223 to a BSQ base, you’re going to have essentially the same level of accuracy as the popular ZK830 Count Scale except there will likely need to be a few RPN keys. You can also enable check counting. So if you’re only job is to make sure that you put 230 screws into a bag and of course counting to 230 is very monotonous. You could set it up so that, 230 is exactly what you want on the scale. You want no deviation, at least not below that. But if they have one extra, you could change those tolerances and it’ll make that backlight turn green if they hit 230 or maybe 231. The display will be red until they get to that point.
Frequently Asked Questions
What is the ZM223 Indicator replacing?
The ZM223 will be replacing the aluminum and stainless steel desktop versions of the ZM301 and ZM303 Indicators as well as the ZQ375 Checkweigher.
Is there a panel mount version of the ZM223?
No, the ZM223 will only be available as a desktop version. The old ZM panel mount versions will remain within our range for now.
Will the new ZM223 also cover the same checkweighing applications, as used in the current ZQ375?
Yes, all of the ZQ375 applications have been modified to work in the ZM223 and its keys. We have also integrated its color-changing backlight to work with the bar graph.
Does the ZM223 have password protection?
The new ZM223 removes the displayed password from being viewed on the screen when entered by a service technician. This stops inquisitive operators gaining access to sensitive areas once the technician leaves.
Is the new ZM223 Lua programmable?
Yes, the ZM223 is fully programmable and comes with a suite of applications that can be customized to meet your customers’ requirements using Lua. All apps are stored on a micro-SD card that ships with the ZM223.Â
How much memory does the ZM223 have?
The ZM223 will ship with a 16GB micro-SD card to provide data storage for approximately 100,000 transactions & up to 2000 PLU’s.
Can any micro-SD card be used inside the ZM223?
The ZM223 includes a 16GB micro-SD card as a standard feature. Currently, it supports micro-SD cards ranging from 4GB to 32GB and can read individual files up to 4GB in size.
Can the ZM223 still fit on the same columns & stand fittings that are supplied with the current ZM202, ZM301, ZM303 and ZQ375 Indicators?
Yes, even though the indicator housing is smaller in size we have kept the indicator width the same so it can still fit directly into the current ZM stands or columns.
How many load cells can be used with the ZM223?
The ZM223 can run one analog base with up to eight 350-ohm load cells. This is ideal for large platforms
or weighbridges that are positioned close to the indicator.
What is the load cell excitation voltage supplied by the ZM223?
The ZM223 provides 5V excitation and is well suited for a variety of installations, including simple
weighbridge application.
What is the maximum distance the ZM223 an be from an Avery Weigh-Tronix truck scale weighbridge?
The ZM223 has been fully tested to work with our current Avery Weigh-Tronix eight cell truck scale
and work adequately from 100 feet away from the weighbridge.
Does the ZM223 have lightning surge suppression built into it?
The ZM223 is a general usage indicator that can be upgraded with a newly designed STVS option
card to protect the indicator’s electronics, including comms lines, from voltage spikes common in outdoor installations.
Is the ZM223 compatible with the high-accuracy BSQ digital base?
Yes, the affordable ZM223 can now be linked up to our high precision BSQ bench bases providing an
affordable high accuracy weight solution. When linked to a BSQ base this will occupy one RS232
comm port to run this digital base.
How many bases can the ZM223 run?
The ZM223 has been designed to run up to two bases: one analog base & one BSQ Digital Bench Base or
two BSQ Digital Bench Bases.
What option cards can be used with the ZM223?
The ZM223 can support the new analog output card that attaches to the inside of the indicator’s rear plate or a new STVS option card that can be fitted to help protect the indicator electronics from large voltage spikes.
Why does the ZM223 have fewer keys than what is offered on the ZM303?
We have reduced the number of keys to lower costs and create a compact enclosure that fits in more
locations. Despite having fewer keys, we maintain full functionality by strategically assigning primary
and secondary functions to each key.Â
What is an RPN function & how can it be used?
RPN (Reverse Polish Notation) provides a configurable secondary key function ideal for entering in key data like: ID Numbers, Piece Weights, PLU Numbers, Target Values, Output Values, Print Format Numbers. To assist with these new RPN functions, each indicator comes with a set of key labels that can be attached to the overlay to help guide the operator to which key can be used with what secondary RPN functions.
How do you change bases on the ZM223 when the indicator keypad has no dedicated base switching key?
Base switching is carried out using an RPN base switching key function. Enter in the required base number one or two and then press the required RPN key to switch base. Example: Setup the Select Key’s RPN function to be “Scale†Press 2 then Select Key to select Scale 2.
What types of communication are available on the ZM223?
The ZM223 comes standard with: two RS232, one Ethernet, one USB host & one Bluetooth connection.
What can I use the Bluetooth for?
The new Bluetooth connection will allow you to connect the ZM223 to our new free Bluetooth phone/
tablet app (Android, Windows and IOS).
Can we connect the ZM223 to a PLC?
Yes, the ZM223 can be quickly linked up to a PLC using its built in Ethernet IP, and Modbus TCP
connections. New default PLC configuration helps speed up setup.
How many inputs & outputs can I drive with the ZM223?
The ZM223 has six programmable I/O that can be either an input or an output. Allowing the indicator
to run filling applications with two ingredients both with two speed filling or it can run a six color light
stack directly from the indicator, ideal for grading applications.
What other power options are available for the ZM223?
The ZM223 can be converted to run off of an external 12-30VDC power source. Additionally, the ZM223 can be powered by a 24V battery or the ZQ-BAT.
Is the ZM223 NSF approved?
Yes, the ZM223 has been NSF approved to be used in food preparation areas.
How many backlight colors does the ZM223 have?
The ZM223 has four configurable backlight colors (Green, Red, Orange & Yellow) that aid the functionality of the indicator app being used. In check weighing, the backlight colors give the operator clear visuals when the weight is within the Under (red), Over (orange) and Accept (green) conditions. In batching, the backlight is used differently to show when the process is running (Green) or paused (red). In each app, the operator can change the color order via the user or supervisor menus. Subject to the indicator app being used.Â
What type of display does this new indicator have?
The ZM223 uses a new HTN LCD display with 1.5″ (38 mm) high digits that are easily viewable from either side of the display with little to no ghosting and can be read in a variety of lighting conditions, including direct sunlight.
Where can I purchase the Avery Weigh-Tronix ZM223 Indicator?
You’ll want to buy the Avery Weigh-Tronix ZM223 weight indicator from authorized distributors like Central Carolina Scale located in Sanford, NC. You can call (919) 776-7737 or visit https://www.centralcarolinascale.com/sales.htm to get started.